In this post, we'll see how to get started with a Spring MVC project in a few steps.
Tools
- Maven 3
- Tomcat 6
- Eclipse Helios/+
- m2eclipse plugin
- Spring IDE plugin
1 Creating the web project
First, let's create a Dynamic Web Project :

Name it Spring-MVC-Tutorial and specify Tomcat 6 as the web server on which the application will be deployed:

And click on FINISH.
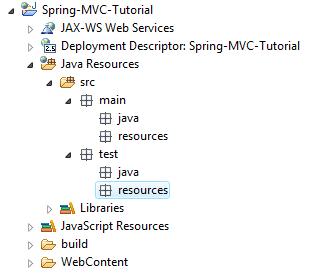
Now, in order to enable Maven support, create the following directories under the src directory :
- main/java
- main/resources
- test/java
- test/resources
As the src directory actually is a source directory, once you've created the mentioned sub directories, these will look like packages, at first:
Then, right-click on the project and choose Maven -> Enable dependency management. This will open a Wizard in which you'll be able to configure Maven related information such as the group ID, the artifact ID, and so on. Following this tutorial, simply keep the default values and click on FINISH.
Now, our project has become a Maven-based project, which looks like this :

2 Adding Spring Maven dependencies
In the pom.xml file, add the following dependencies, so that Maven retrieves the libraries necessary to a Spring-MVC project :
- spring-core
- spring-context
- spring-webmvc
As soon as you've added these dependencies, you could see that Maven has automatically downloaded the related libraries and added them to the project's classpath :

Here's what our Maven configuration file looks like :
<project xmlns="http://maven.apache.org/POM/4.0.0" xmlns:xsi="http://www.w3.org/2001/XMLSchema-instance"
 xsi:schemaLocation="http://maven.apache.org/POM/4.0.0 http://maven.apache.org/xsd/maven-4.0.0.xsd">
 <modelVersion>4.0.0</modelVersion>
 <groupId>Spring-MVC-Tutorial</groupId>
 <artifactId>Spring-MVC-Tutorial</artifactId>
 <packaging>war</packaging>
 <version>0.0.1-SNAPSHOT</version>

 <properties>
  <spring-version>3.1.1.RELEASE</spring-version>
 </properties>

 <build>
  <plugins>
   <plugin>
    <groupId>org.apache.maven.plugins</groupId>
    <artifactId>maven-war-plugin</artifactId>
    <version>2.2</version>
    <configuration>
     <!-- specifiy which directory within the project hierarchy will be considered
      as the root directory from the generated war file -->
     <warSourceDirectory>WebContent</warSourceDirectory>
    </configuration>
   </plugin>
  </plugins>
 </build>

 <dependencies>
  <dependency>
   <groupId>org.springframework</groupId>
   <artifactId>spring-core</artifactId>
   <version>${spring-version}</version>
  </dependency>
  <dependency>
   <groupId>org.springframework</groupId>
   <artifactId>spring-context</artifactId>
   <version>${spring-version}</version>
  </dependency>
  <dependency>
   <groupId>org.springframework</groupId>
   <artifactId>spring-webmvc</artifactId>
   <version>${spring-version}</version>
  </dependency>
 </dependencies>
</project>
Note that we have added the "maven-war-plugin" to specify that at the WAR file generation, the "WebContent" directory should be considered as being the web application root directory.
3 Configuring the DispatcherServlet
A Spring-MVC project follows the "Front controller" pattern : we'll define a servlet based on Spring's DispatcherServlet class. This servlet serves as "front controller" and will handle incoming requests. It will then dispatch them to the appropriate controller classes, based on each request's URL.
Let's define the servlet : in the web.xml file (which is located in WebContent/WEB-INF):
<?xml version="1.0" encoding="UTF-8"?>
<web-app xmlns:xsi="http://www.w3.org/2001/XMLSchema-instance"
 xmlns="http://java.sun.com/xml/ns/javaee" xmlns:web="http://java.sun.com/xml/ns/javaee/web-app_2_5.xsd"
 xsi:schemaLocation="http://java.sun.com/xml/ns/javaee http://java.sun.com/xml/ns/javaee/web-app_2_5.xsd"
 id="WebApp_ID" version="2.5">
 <display-name>Spring MVC tutorial</display-name>

 <servlet>
  <servlet-name>MyDispatcherServlet</servlet-name>
  <servlet-class>org.springframework.web.servlet.DispatcherServlet</servlet-class>
 </servlet>

 <servlet-mapping>
  <servlet-name>MyDispatcherServlet</servlet-name>
  <url-pattern>*.go</url-pattern>
 </servlet-mapping>
</web-app>
As you can see, in our example, we've mapped all incoming requests with the ".do" extension to be handled by the servlet named "MyDispatcherServlet", which is the front controller to our application.
4 Spring context configuration
Now, we'll create the Spring configuration XML file : under the WEB-INF directory, create a new Spring configuration file. As we've installed the Spring IDE plugin, (this plugin is very handy when it comes to Spring configuration as it provides, among other things, some auto-completion and validation), right-click -> New -> Other -> Spring -> Spring Bean configuration file
By default, with a Spring-MVC project, Spring will look for a Spring configuration file that is named as follows : [DispatcherServlet's name]-servlet.xml
So in our case, we'll name our Spring configuration file : MyDispatcherServlet-servlet.xml
Here's the content of our Spring configuration file :
<?xml version="1.0" encoding="UTF-8"?>
<beans xmlns="http://www.springframework.org/schema/beans"
 xmlns:xsi="http://www.w3.org/2001/XMLSchema-instance"
 xmlns:context="http://www.springframework.org/schema/context"
 xmlns:mvc="http://www.springframework.org/schema/mvc"
 xsi:schemaLocation="http://www.springframework.org/schema/beans http://www.springframework.org/schema/beans/spring-beans.xsd
  http://www.springframework.org/schema/context http://www.springframework.org/schema/context/spring-context-3.1.xsd
  http://www.springframework.org/schema/mvc http://www.springframework.org/schema/mvc/spring-mvc-3.1.xsd">

 <!-- Enabling Spring beans auto-discovery -->
 <context:component-scan base-package="controller" />

 <!-- Enabling Spring MVC configuration through annotations -->
 <mvc:annotation-driven />

 <!-- Defining which view resolver to use -->
 <bean class= "org.springframework.web.servlet.view.InternalResourceViewResolver" >
  <property name="prefix" value="/WEB-INF/views/" />
  <property name="suffix" value=".jsp" />
 </bean>
</beans>
- We have enabled Spring beans auto-discovery by adding <context:component-scan base-package="controller" />
- Spring-MVC related configuration will be defined through annotations as we have added <mvc:annotation-driven />
- We will be using the InternalResourceViewResolver to define which view should be rendered to the user, once the controller class has handled incoming requests. More on this below... For now, just try to remember that we gave its "prefix" property the value "/WEB-INF/views/", and its "suffix" property the vlaue ".jsp".
5 Implementing the controller
Create a package named "controller". This package name is not arbitrary. It should match the package name that we've specified in the <context:component-scan> element in the Spring configuration file.
Then, create a class as follows. You may choose another the name as it is not significant : due to our Spring configuration, Spring will scan the "controller" package and look for classes with Spring annotations (such as @Component, @Controller, @Service, and @Repository).
package controller;

import org.springframework.stereotype.Controller;
import org.springframework.web.bind.annotation.RequestMapping;
import org.springframework.web.bind.annotation.RequestMethod;

@Controller
public class MyController {

 @RequestMapping(method=RequestMethod.GET, value="/home")
 public String handleRequest(){
  return "welcome";
 }
}
- The @Controller annotation indicates that our class is a Spring registered bean
- The @RequestMapping annotation marks the handleRequest( ) method as a method that will be executed to handle GET method requests with /home URI.
Basically, whenever an incoming request is handled by the handleRequest( ) method, as it returns unconditionally "welcome", the view resolver from type InternalResourceViewResolver will concatenate the defined prefix, to this value, and then to the defined suffix.
So, in our case, the view to be rendered would be : /WEB-INF/views/welcome.jsp
6 Create the sample view file (JSP)
- First, create a directory named "views" under WEB-INF
- In the "views" directory, create a JSP page named "welcome.jsp" as follows :
<%@ page language="java" contentType="text/html; charset=ISO-8859-1"
    pageEncoding="ISO-8859-1"%>
<!DOCTYPE html PUBLIC "-//W3C//DTD HTML 4.01 Transitional//EN" "http://www.w3.org/TR/html4/loose.dtd">
<html>
<head>
<meta http-equiv="Content-Type" content="text/html; charset=ISO-8859-1">
<title>Spring-MVC-Tutorial</title>
</head>
<body>
Welcome my Spring-MVC-Tutorial homepage
</body>
</html>
7 WAR file generation and deployment
With the M2Eclipse plugin, simply run the project as "Maven package". Then copy the generated WAR file from the "target" directory into the "webapps" directory from Tomcat.
8 Testing the application
Open a browser, type the following URL :
- http://localhost/Spring-MVC-Tutorial-0.0.1-SNAPSHOT/home.go

9 Source code
The project we went through step by step, may be downloaded/checked out (github repository) here. Just make sure you get the master branch of the Spring-MVC-Tutorials repository.
