Tuesday, May 29, 2012

A quick tutorial to Spring-MVC with Maven

In this post, we'll see how to get started with a Spring MVC project in a few steps.

Tools

  • Maven 3
  • Tomcat 6
  • Eclipse Helios/+
    • m2eclipse plugin
    • Spring IDE plugin

1 Creating the web project

First, let's create a Dynamic Web Project : 


Name it Spring-MVC-Tutorial and specify Tomcat 6 as the web server on which the application will be deployed:


And click on FINISH.

Now, in order to enable Maven support, create the following directories under the src directory : 
  • main/java
  • main/resources
  • test/java
  • test/resources
As the src directory actually is a source directory, once you've created the mentioned sub directories, these will look like packages, at first:
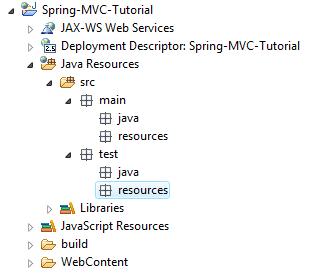

Then, right-click on the project and choose Maven -> Enable dependency management. This will open a Wizard in which you'll be able to configure Maven related information such as the group ID, the artifact ID, and so on. Following this tutorial, simply keep the default values and click on FINISH.

Now, our project has become a Maven-based project, which looks like this : 


2 Adding Spring Maven dependencies

In the pom.xml file, add the following dependencies, so that Maven retrieves the libraries necessary to a Spring-MVC project : 
  • spring-core
  • spring-context
  • spring-webmvc
As soon as you've added these dependencies, you could see that Maven has automatically downloaded the related libraries and added them to the project's classpath : 


Here's what our Maven configuration file looks like :

<project xmlns="http://maven.apache.org/POM/4.0.0" xmlns:xsi="http://www.w3.org/2001/XMLSchema-instance"
 xsi:schemaLocation="http://maven.apache.org/POM/4.0.0 http://maven.apache.org/xsd/maven-4.0.0.xsd">
 <modelVersion>4.0.0</modelVersion>
 <groupId>Spring-MVC-Tutorial</groupId>
 <artifactId>Spring-MVC-Tutorial</artifactId>
 <packaging>war</packaging>
 <version>0.0.1-SNAPSHOT</version>

 <properties>
  <spring-version>3.1.1.RELEASE</spring-version>
 </properties>

 <build>
  <plugins>
   <plugin>
    <groupId>org.apache.maven.plugins</groupId>
    <artifactId>maven-war-plugin</artifactId>
    <version>2.2</version>
    <configuration>
     <!-- specifiy which directory within the project hierarchy will be considered 
      as the root directory from the generated war file -->
     <warSourceDirectory>WebContent</warSourceDirectory>
    </configuration>
   </plugin>
  </plugins>
 </build>  

 <dependencies>
  <dependency>
   <groupId>org.springframework</groupId>
   <artifactId>spring-core</artifactId>
   <version>${spring-version}</version>
  </dependency>
  <dependency>
   <groupId>org.springframework</groupId>
   <artifactId>spring-context</artifactId>
   <version>${spring-version}</version>
  </dependency>
  <dependency>
   <groupId>org.springframework</groupId>
   <artifactId>spring-webmvc</artifactId>
   <version>${spring-version}</version>
  </dependency>
 </dependencies>
</project>

Note that we have added the "maven-war-plugin" to specify that at the WAR file generation, the "WebContent" directory should be considered as being the web application root directory.

3 Configuring the DispatcherServlet

A Spring-MVC project follows the "Front controller" pattern : we'll define a servlet based on Spring's DispatcherServlet class. This servlet serves as "front controller" and will handle incoming requests. It will then dispatch them to the appropriate controller classes, based on each request's URL.

Let's define the servlet : in the web.xml file (which is located in WebContent/WEB-INF):


<?xml version="1.0" encoding="UTF-8"?>
<web-app xmlns:xsi="http://www.w3.org/2001/XMLSchema-instance"
 xmlns="http://java.sun.com/xml/ns/javaee" xmlns:web="http://java.sun.com/xml/ns/javaee/web-app_2_5.xsd"
 xsi:schemaLocation="http://java.sun.com/xml/ns/javaee http://java.sun.com/xml/ns/javaee/web-app_2_5.xsd"
 id="WebApp_ID" version="2.5">
 <display-name>Spring MVC tutorial</display-name>
  
 <servlet>
  <servlet-name>MyDispatcherServlet</servlet-name>
  <servlet-class>org.springframework.web.servlet.DispatcherServlet</servlet-class>
 </servlet>
 
 <servlet-mapping>
  <servlet-name>MyDispatcherServlet</servlet-name>
  <url-pattern>*.go</url-pattern>
 </servlet-mapping>
</web-app>

As you can see, in our example, we've mapped all incoming requests with the ".do" extension to be handled by the servlet named "MyDispatcherServlet", which is the front controller to our application.

4 Spring context configuration

Now, we'll create the Spring configuration XML file : under the WEB-INF directory, create a new Spring configuration file. As we've installed the Spring IDE plugin, (this plugin is very handy when it comes to Spring configuration as it provides, among other things, some auto-completion and validation), right-click -> New -> Other -> Spring -> Spring Bean configuration file

By default, with a Spring-MVC project, Spring will look for a Spring configuration file that is named as follows : [DispatcherServlet's name]-servlet.xml
So in our case, we'll name our Spring configuration file : MyDispatcherServlet-servlet.xml

Here's the content of our Spring configuration file : 


<?xml version="1.0" encoding="UTF-8"?>
<beans xmlns="http://www.springframework.org/schema/beans"
 xmlns:xsi="http://www.w3.org/2001/XMLSchema-instance"
 xmlns:context="http://www.springframework.org/schema/context"
 xmlns:mvc="http://www.springframework.org/schema/mvc"
 xsi:schemaLocation="http://www.springframework.org/schema/beans http://www.springframework.org/schema/beans/spring-beans.xsd
  http://www.springframework.org/schema/context http://www.springframework.org/schema/context/spring-context-3.1.xsd
  http://www.springframework.org/schema/mvc http://www.springframework.org/schema/mvc/spring-mvc-3.1.xsd">
 
 <!-- Enabling Spring beans auto-discovery -->
 <context:component-scan base-package="controller" />

 <!-- Enabling Spring MVC configuration through annotations -->
 <mvc:annotation-driven />

 <!-- Defining which view resolver to use -->
 <bean class= "org.springframework.web.servlet.view.InternalResourceViewResolver" > 
  <property name="prefix" value="/WEB-INF/views/" /> 
  <property name="suffix" value=".jsp" /> 
 </bean>
</beans>

  • We have enabled Spring beans auto-discovery by adding <context:component-scan base-package="controller" />
  • Spring-MVC related configuration will be defined through annotations as we have added <mvc:annotation-driven />
  • We will be using the InternalResourceViewResolver to define which view should be rendered to the user, once the controller class has handled incoming requests. More on this below... For now, just try to remember that we gave its "prefix" property the value "/WEB-INF/views/", and its "suffix" property the vlaue ".jsp".

5 Implementing the controller

Create a package named "controller". This package name is not arbitrary. It should match the package name that we've specified in the <context:component-scan> element in the Spring configuration file. 

Then, create a class as follows. You may choose another the name as it is not significant : due to our Spring configuration, Spring will scan the "controller" package and look for classes with Spring annotations (such as @Component, @Controller, @Service, and @Repository).


package controller;

import org.springframework.stereotype.Controller;
import org.springframework.web.bind.annotation.RequestMapping;
import org.springframework.web.bind.annotation.RequestMethod;

@Controller
public class MyController {
 
 @RequestMapping(method=RequestMethod.GET, value="/home")
 public String handleRequest(){
  return "welcome";
 }
}


  • The @Controller annotation indicates that our class is a Spring registered bean
  • The @RequestMapping annotation marks the handleRequest( ) method as a method that will be executed to handle GET method requests with /home URI.
Basically, whenever an incoming request is handled by the handleRequest( ) method, as it returns unconditionally "welcome",  the view resolver from type InternalResourceViewResolver will concatenate the defined prefix, to this value, and then to the defined suffix.

So, in our case, the view to be rendered would be : /WEB-INF/views/welcome.jsp

6 Create the sample view file (JSP)

  1. First, create a directory named "views" under WEB-INF
  2. In the "views" directory, create a JSP page named "welcome.jsp" as follows : 

<%@ page language="java" contentType="text/html; charset=ISO-8859-1"
    pageEncoding="ISO-8859-1"%>
<!DOCTYPE html PUBLIC "-//W3C//DTD HTML 4.01 Transitional//EN" "http://www.w3.org/TR/html4/loose.dtd">
<html>
<head>
<meta http-equiv="Content-Type" content="text/html; charset=ISO-8859-1">
<title>Spring-MVC-Tutorial</title>
</head>
<body>
Welcome my Spring-MVC-Tutorial homepage
</body>
</html>


7 WAR file generation and deployment

With the M2Eclipse plugin, simply run the project as "Maven package". Then copy the generated WAR file from the "target" directory into the "webapps" directory from Tomcat.

8 Testing the application

Open a browser, type the following URL : 
  • http://localhost/Spring-MVC-Tutorial-0.0.1-SNAPSHOT/home.go
And you will get to the following page : 

9 Source code

The project we went through step by step, may be downloaded/checked out (github repository) here. Just make sure you get the master branch of the Spring-MVC-Tutorials repository.

Friday, May 18, 2012

TestNG for starters : running a same test method several times with different parameter values

When using TestNg to write unit tests, one of the most common mistake I see people make is writing a test method in which they make several assertions in order to test giving different values as input to the method to be tested.

To illustrate this common mistake, let's assume we have a class named StringConcatener, which provides a static method to concatenate 2 given String objects :

public class StringConcatener {
 
 public static String concatStrings(String s1, String s2){
  if(s1 == null){
   s1 = "null";
  }
  
  return s1 + s2;
 }
}

Now, we are going to write a test class in which we will implement a method that will check the behavior of our concatStrings( ) method against different input values. To do this, new TestNg users often tend to stuff lots of assertions inside a same test method, just like this : 


public class TestStringConcatener {

 @Test
 public void testConcatener() {
  Assert.assertEquals(StringConcatener.concatStrings("null", "null"), "nullnull");
  Assert.assertEquals(StringConcatener.concatStrings(null, null), "nullnull");
  Assert.assertEquals(StringConcatener.concatStrings("StringA", "StringB"), "StringAStringB");
  Assert.assertEquals(StringConcatener.concatStrings("StringA", null), "StringAnull");
  // and many other assertions...
 }
}

This test method works fine but only if every assertions get the expected result. Suppose the 1st assertion does not get the expected result. Then, none of the assertions that follows it will be tested. That, obviously, is not how you want your test class to behave.

Solution


  1. Write a test method with 3 arguments : the 2 String objects to be concatenated + the expected result
  2. Marked this test method with @Test(dataProvider="EqualsAssertionsProvider") : this method is a test method which expects input from the DataProvider named "EqualsAssertionsProvider"
  3. Write the method that will provide the set of input values to the test method, and mark it with @DataProvider(name="EqualsAssertionsProvider"). The name attribute in the @DataProvider annotation specifies its name. 

public class TestStringConcatener {
 
 @DataProvider(name="EqualsAssertionsProvider")
 public Object[][] createConcatenationAssertionSet(){
  return new Object[][]{
    new Object []{"null", "null", "nullnull"},
    new Object []{null, null, "nullnull"},
    new Object []{"StringA", "StringB", "StringAStringB"},
    new Object []{"StringA", null, "StringAnull"},
  };
 }
 
 @Test(dataProvider="EqualsAssertionsProvider")
 public void testConcatener(String s1, String s2, String expectedResult){
  Assert.assertEquals(StringConcatener.concatStrings(s1, s2), expectedResult);
 }
}

As you can see, in the example above, the createConcatenationAssertionSet( ) method returns a 2 dimensional Object array :

  • the first dimension determines how many input sets the DataProvider holds (that is, how many times our test method will run)
  • the second dimension holds Object arrays that contains the values for each argument from our test method. As there are 3 arguments in our test method, each of these Object arrays contains 3 values.
Now that you're working with a DataProvider, should one of your assertions fail, the following ones will still be tested. To illustrate that, let's modify the expected result of the third input set from our DataProvider : 

new Object []{"StringA", "StringB", "StringAStringB"}

becomes

new Object []{"StringA", "StringB", "StringAStringX"}
Let's run our TestClass and see what are the results :


As you can see, the third assertions failed (the exact reason is shown on the right column), but the 4th assertions has still been checked. Voilà!

Look out!

As strange as it may look, DataProvider methods can only have 2 type of returns : Object[ ][ ] or Iterator<Object>[ ]. Maybe that would change in the future but at the time I wrote this post, I was using the latest available version of TestNg (6.3.1)

Sunday, April 8, 2012

Jamon : a quick and easy way to monitor Java web applications' performances

In this post, I would like to introduce a very handy way to monitor a Java web application's performance, using Jamon (click on the link to get to the Jamon project homepage). 


There are numerous ways to monitor the performances from a Java web application, but how easy it is set up and what kind of information you need in return, will determine the solution you'll choose. This could go from printing out (or logging) execution time, which has been explicitly calculated (stop time - start time), on the standard exit, to AOP using Spring Aspect or AspectJ.


The most interesting feature Jamon provides, is a web application showing you the monitoring's result.

Tools

  • Apache Tomcat 6.0.32
  • Jamon 2.73

How to use it (basic usage)

  1. Download Jamon distribution file
  2. Copy the jamon-2.73.jar library into the classpath of the project for which you want to enable monitoring.

    Remark
    Actually, you would rather copy this library to the directory from you web server, that contains the libraries that are shared across all the deployed applications. In my case, as I deployed a sample application on a Tomcat server, I copied the jamon-2.73.jar library into the %TOMCAT_HOME%/lib directory. Also, if you intend to use the provided monitoring console, you should definitely shared the library across all the applications.
  3. Deploy the provided monitoring console by copying the jamon.war file from the Jamon distribution to the %TOMCAT_HOME%/webapps directory.
  4. Add monitoring instructions to the code section you want to watch. As an example, here's some code to illustrate a practical use of Jamon : 

package org.blog.khy;

import java.io.IOException;
import java.util.Random;

import javax.servlet.ServletException;
import javax.servlet.http.HttpServlet;
import javax.servlet.http.HttpServletRequest;
import javax.servlet.http.HttpServletResponse;

import com.jamonapi.Monitor;
import com.jamonapi.MonitorFactory;

/**
 * Servlet implementation class JamonDemoServlet
 */
public class JamonDemoServlet extends HttpServlet {
 private static final long serialVersionUID = 1L;
 private static final Random RANDOM = new Random();
 
 @Override
 protected void doPost(HttpServletRequest req, HttpServletResponse resp) throws ServletException, IOException {
  doGet(req, resp);
 }

 @Override
 protected void doGet(HttpServletRequest req, HttpServletResponse resp) throws ServletException, IOException {
  String action = req.getParameter("action");

  if (action.equalsIgnoreCase("LOGIN")) {
   login(req, resp);
  } else if (action.equals("CHECKOUT")) {
   checkoutCart(req, resp);
  }
 }

 private void login(HttpServletRequest req, HttpServletResponse resp) throws IOException {
  Monitor mon = MonitorFactory.start("login");

  // simulating login process
  long randomProcessTime = (long) (RANDOM.nextDouble() * 1000.0);
  resp.getWriter().print("PROCESSED LOGIN REQUEST");
  
  try {
   Thread.sleep(randomProcessTime);
  } catch (InterruptedException e) {
   e.printStackTrace();
  }

  mon.stop();
 }

 private void checkoutCart(HttpServletRequest req, HttpServletResponse resp) throws IOException {
  Monitor mon = MonitorFactory.start("checkout");

  // simulating cart checkout process
  long randomProcessTime = (long) (RANDOM.nextDouble() * 3000.0);
  resp.getWriter().print("PROCESSED CHECKOUT REQUEST");
  
  try {
   Thread.sleep(randomProcessTime);
  } catch (InterruptedException e) {
   e.printStackTrace();
  }

  mon.stop();
 }
}


As you can see,  it's very simple to use Jamon : first, you'll retrieve and start a Monitor object by executing MonitorFactory.start(String label). The "label" argument designates the name under which the code section to monitor will be identified within the monitoring console. 


At the end of the code section that you're monitoring, just call the stop( ) method on the Monitor object. 


And voilà...


I've deployed this sample servlet and had it process a few requests (some with the "action" parameter = LOGIN, some otheres with the value CHECKOUT. 


Monitoring console

Finally, open the Jamon monitoring console which is deployed at the following address : http://localhost:8080/jamon

Click on the "JAMon Admin Page" link and you'll be brought to the page from which you could access all the monitoring info : 


Among all the infos, you'll have the number of times your monitored code has been executed, the average execution time, the longest/shortest execution time, and so on.

Remarks

You might think that Jamon is only useful during development but from my personal experience, you could deploy it along with your application into production : 
  • its footprint is practically non significative
  • you can disable/enable monitoring in one click, from the administration console
  • you can filter the monitor that you want to display in the list
That was just a slight overview of Jamon's features, you should definitely take a look at its documentation, as it provides some other monitoring functionalities.

Tuesday, March 13, 2012

Remote debugging with Tomcat with Eclipse

Lately, as I was handing over some projects to a new colleague, I realized that remotely debugging a Java application which is deployed on a Tomcat instance, isn't actually trivial to every developer. 
That being said, I guess it is legitimate for a Java developer not to know that nice feature since most of us will probably work through embedding an instance of Tomcat within Eclipse.

However, there are situations in which you would definitely have to debug remotely. That's the reason why I think this topic is worth writing a post...

Configuration
As stated in the Apache Tomcat documentation, in order to enable remote debugging support, you'll need to pass the following argument to the JVM used by Tomcat, when it starts : 

-Xdebug -Xrunjdwp:transport=dt_socket,address=8000,server=y,suspend=n

Since Apache has already announced that they'll stop supporting Tomcat 5 soon, therefore I won't address this version of Tomcat's configuration. 

Regarding Tomcat 6 (and later), it already provides all the required configuration in the catalina.bat file : the default transport type is already set to "dt_socket" (the other supported transport type is "shared memory" but this one is not commonly used - actually, I haven't used it so far so I won't be able to tell you what it is about precisely) and the default port is set to 8000. In case the port number 8000 is already in use in your environment, you can simply change it by editing the catalina.bat file. 

Here's the section from the catalina.bat file that would interest you :

if not ""%1"" == ""jpda"" goto noJpda
set JPDA=jpda
if not "%JPDA_TRANSPORT%" == "" goto gotJpdaTransport
set JPDA_TRANSPORT=dt_socket
:gotJpdaTransport
if not "%JPDA_ADDRESS%" == "" goto gotJpdaAddress
set JPDA_ADDRESS=8000
:gotJpdaAddress
if not "%JPDA_SUSPEND%" == "" goto gotJpdaSuspend
set JPDA_SUSPEND=n
:gotJpdaSuspend
if not "%JPDA_OPTS%" == "" goto gotJpdaOpts
set JPDA_OPTS=-agentlib:jdwp=transport=%JPDA_TRANSPORT%,address=%JPDA_ADDRESS%,server=y,suspend=%JPDA_SUSPEND%
:gotJpdaOpts
shift
:noJpda

Suppose you need to change the default port, you'll, then, set another value to the JPDA_ADDRESS variable.

Running Tomcat with remote debugging enabled
  • deploy the application you need to debug as usually
  • start Tomcat by executing the catalina.bat script and providing the "jpda" argument 
(ex.: D:\Develtools\apache-tomcat-7.0.26\bin>catalina jpda start)

Then, all you need to do is to create a remote Java application in Eclipse through these few steps : 

1° Open the debug configurations 
2° Create a new Remote Java application : 


3° Specify the project you're debugging (in my example, I've configured remote debugging for one on my sample projects, named "Blog - Remote Tomcat debugging")
4° Specify the host on which the application to debug is deployed
5° Specify the port that is opened for debugging purpose (same as the one configured as JPDA_ADDRESS in the catalina.bat file from Tomcat)
6° Launch the Remote application by clicking on "Debug" 

At this point, you could set breakpoints wherever you want in the project's source code and if the code marked with your breakpoints is executed, the running thread will be suspended and you'll be able to watch variables' value, execute expression, and so on.

Tuesday, October 18, 2011

SingleThreadModel : why you should not implement it and what happens if you do

According to the Servlet specifications, the SingleThreadModel interface is deprecated since the 2.4 version of the specs. The reason why it has been deprecated is that it cannot actually guarantee thread-safety, as its name suggests. But do you know what would the consequences be if you still have a servlet implement SingleThreadModel?

The side-effects of having a servlet implement SingleThreadModel are vendor-specific. Having worked with some legacy code deployed on a Tomcat 4.x container which contains a servlet that implements SingleThreadModel, I've noticed the following behavior : the container can processed a maximum of 20 simultaneous POST requests.

Explanations

Since true thread-safety cannot be achieved by implementing SingleThreadModel, each servlet container will have 2 possibilities for treating SingleThreadModel type servlets :

  • the container manages a servlet pool (2 simultaneous requests to a same servlet will actually be handled by 2 distinct instances of the requested servlet).
  • the container synchronizes the service( ) method of the requested servlet
Use-case : SingleThreadModel servlet deployed on Tomcat
 
Here's the code for the servlet we'll deployed onto any version of Tomcat for our test purpose :


public class TestServlet extends HttpServlet implements SingleThreadModel {
 private static int requestCounter = 0;
 
 @Override
 protected void doPost(HttpServletRequest req, HttpServletResponse resp)
   throws ServletException, IOException {
  
  doGet(req, resp);
 }
 
 @Override
 protected void doGet(HttpServletRequest req, HttpServletResponse resp)
   throws ServletException, IOException {
  
  try {
   System.out.println("Start processing request with servlet " 
                        + instance : " + this + "[CPT : " + ++requestCounter + "]");
   Thread.sleep(1000000); // simulate a uber long request
  } catch (InterruptedException e) {
   e.printStackTrace();
  }
 }
}

How to run the test?

Simply send 21 POST requests to the servlet and you'll see that the 21st request and the following ones aren't not processed by the container :


Where is this limit of 20 servlet instances configured?


Conclusion


Having a servlet implement SingleThreadModel is definitely a conception flaw that could lead to performance breakdown in the best case scenario, and to a deadlock in the worse case scenario.


Sunday, August 21, 2011

Intalio BPMS : replacing the Derby in-memory DB by MySQL

By default, Intalio BPMS Enterprise Edition is configured to run against a Derby in-memory DB. This DB configuration is pretty handy and make Intalio an out of the box tool for deploying and executing business processes. Nevertheless, as soon as you'll be considering integrating Intalio to a production environment, you'll may also consider having Intalio run against a more robust RDBMS for different reasons : crash recovery facilities, backup & restore procedures, and so on. Most of the most popular RDMBS are supported by Intalio BPMS but the Community Edition only supports MySQL. 

This post describes the procedure to follow to have Intalio BPMS run against a MySQL DB.

1° Tool versions

Here are the tools and their respective version the following procedure is intended to :
  • intalio-bpms-6.0.3.022
  • mysql-5.5.15-win32 (Zip archive)
  • Windows Vista 32bits
2° Setting up MySQL and creating a database for Intalio
  • First, unzip the MySQL archive and let's refer to this directory as MYSQL_HOME
  • Open a CMD console and go to the %MYSQL_HOME%/bin directory. Then execute : mysqld --console to startup the DB server
  • By default, the MySQL root user does not have any password associated. You can defined its password by executing : mysqladmin -u root password PASSWORD (PASSWORD's value is up to you, of course)
  • Let's create a DB user for the Intalio server. First, connect to MySQL as user "root" : mysql -u root -p (the -p option will make the console ask you the password). Then execute the following command : mysql > CREATE USER 'intalio'@'localhost' IDENTIFIED BY PASSWORD; (PASSWORD's value corresponds to the password assigned to the user 'intalio' and is up to you ) (don't forget the semicolon to have the MySQL prompt execute your command)
  • Let's create a database for Intalio (I called it "intaliodb" but you can choose another name for yours). For this command too, you'll have to connect to the MySQL server as user "root" : mysql > create database intaliodb; (after having executed this command, you can check the "intaliodb" database does exist by executing this command : show databases;)
  • Once the "intaliodb" has been created, you'll have to grant some permissions to the user "intalio" so that it will be able to create new tables, rows, and so on. Here's the command to execute, once you're connected as user "root" : mysql > grant CREATE,INSERT,DELETE,UPDATE,SELECT on intaliodb.* to intalio@localhost;
3° Configuring Intalio server
  • At %INTALIO_HOME%/databases/MySQL, you'll find a SQL script named BPMS.sql. Executing this script on the "intaliodb" database will create the tables and indexes required by Intalio BPMS. Beware !!! This script contains the "type" keyword that's deprecated since MySQL 4.x. To execute this script on our MySQL 5.x server, we'll have to manually replace the "type" keyword by "engine" (basically, you only need to replace all the "type=innodb" and "type = innodb" in the BPMS.sql script by "engine=innodb"). Then, simply execute the script : (from a CMD console) mysql -u root -p intaliodb < PATH_TO_SCRIPT_FILE
  • The last required step to configure the Intalio server is telling the Intalio server which JDBC driver it shoud use, and which database it should connect to. To achieve this, just replace the content of the %INTALIO_HOME%/conf/resources.properties file by the content of the %INTALIO_HOME%/databases/MySQL/tomcat-5-resources.properties file. Then, you'll need to customize some parameters to your own configuration. If you followed this procedure, here's how you properties file should look like : 


4° Redeploying existing processes 
  • Now that we've replaced the default Derby database server by MySQL, all we need to do is redeploying the existing processes so that their associated info are stored in the MySQL server. To do that, start your Intalio server and then delete all the files with the .deployed extension in the %INTALIO_HOME%/var/deploy directory. The deleted file should be recreated after a few seconds, which is the time the Intalio server needs to hot-redeploy the processes.
5° Test

In order to check that your new Intalio configuration runs smoothly, you could run some of your existing processes (preferably, some with tasks or notifications) and then, check what is actually stored in the database. 

I'm personally using either SqlWave or HeidiSQL which are both great MySQL GUI clients when I need to perform some sort of monitoring work on the database used by my Intalio processes. Feel free to take a look at the tables whose name begins with "tempo_", they hold all the info related to your processes (tasks, notification, task status, assigned user, and so on) : 


    Sunday, July 10, 2011

    EJB 3 example - Exposing a stateless session beans as a web service (JBoss AS6)

    In this post, we'll see how to expose an EJB3 stateless session bean as a web service using annotations (= Top-down method given that the starting point is code implementation), within JBoss AS 6. For those who are already familiar with JAX-WS annotations, the implementation part will be straightforward. But the tricky part could reside in how to retrieve its WSDL in order to invoke it : this part depends on the server in use and may even be vendor-specific. If you deploy a web service on a Tomcat server, for instance, it is possible to specify in the server.xml file that you want to publish a list of all the available web services from a given application context...

    You'll see below that retrieving the WSDL from a web service deployed on JBoss AS 6 is even simpler.

    1° Implementing the web service

    One important thing you shouldn't forget is that, as defined in the EJB 3 specifications, only stateless session beans can be exposed as web services. Below, you'll see the 2 ways JAX-WS specifications allow you to follow in order to implement a stateless session bean as a web service : with or without defining an interface.

    A. Without defining a service interface

    package beans;
    
    import java.math.BigDecimal;
    
    import javax.ejb.Stateless;
    import javax.jws.WebService;
    
    @Stateless
    @WebService(serviceName = "CalcService", portName = "CalcPort")
    public class CalculatorBean {
     
     public Double add(Double operand1, Double operand2){
      BigDecimal op1 = new BigDecimal(operand1.toString());
      BigDecimal op2 = new BigDecimal(operand2.toString());
      
      return op1.add(op2).doubleValue();
     }
    }

    B With a service interface
    package beans;
    
    import java.util.Date;
    
    import javax.jws.WebService;
    
    @WebService
    public interface Clock {
     
     public Date getTime();
    }
    
    
    package beans;
    
    import java.util.Date;
    
    import javax.ejb.Stateless;
    import javax.jws.WebService;
    
    @Stateless
    @WebService(serviceName="G-Shock", portName="G-Shock-Port", endpointInterface="beans.Clock")
    public class ClockBean implements Clock{
    
     @Override
     public Date getTime() {
      return new Date();
     }
    
    }


    To test these classes, simply create an EJB project with Eclipse (FYI, I'm using Eclipse Helios). Create a source folder named "src" within this project. Then create a package named "beans". Paste the 2 classes and the interface in the "beans package" and deploy the whole project on the JBoss AS server.

    2° Accessing the published WSDL

    Once both the services are deployed, go to the administration page of your JBoss AS server (since I'm working locally using the 8080 port, mine is located at http://localhost:8080) :


    Then, click on "JBoss Web Services Console". This link will bring you into the JBossWS page. Then, click on  "View a list of deployed services" This will bring you to a page where you'll see a list of available web services : 


    From this page, you can click on the "Endpoint Address" of each service, which will bring you to the corresponding WSDL.

    Voilà, you're go to go with your first EJB 3 compliant web service.